How to Plan a Safe Bachelorette Party Limo Night
Planning a Safe Bachelorette Limo Night
To plan a safe bachelorette party limo night, book a licensed and fully insured limo company, put the itinerary and pickup times in writing, assign one point-of-contact for the group, and set simple in-vehicle and in-venue safety rules (buddy system, drink awareness, location sharing) before the night starts.
Table of Contents
5 Must-Check Safety Items Before Booking Your Limo
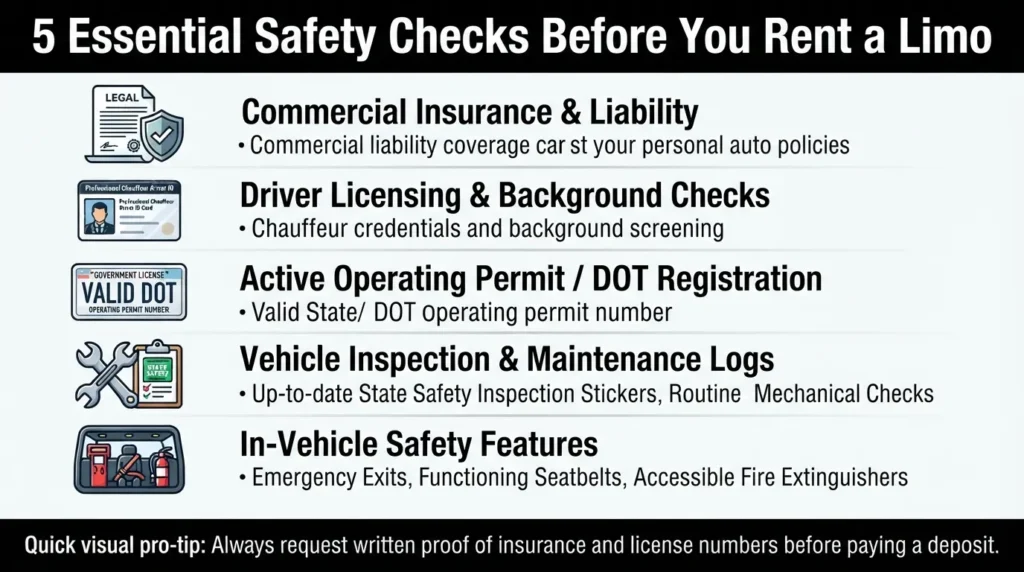
Booking a limousine isn’t just about picking a sleek vehicle; it’s about making sure everyone gets home safely at the end of the night. Pretty website photos don’t guarantee a safe ride. To protect your group—and your wallet—run through this quick 5-point safety checklist before you pay a single dollar in deposits.
1. Request Proof of Commercial Insurance
Never take a company’s word for it when they say they are “fully insured.” Personal auto insurance won’t cover passengers in a commercial vehicle if an accident occurs. Ask the company to email you a Certificate of Commercial Liability Insurance. Legitimate operators handle these requests daily and won’t hesitate to share proof. Look closely to confirm the policy is active and covers their entire fleet.
2. Verify Chauffeur Licensing and Background Checks
A luxury vehicle is only as safe as the person behind the wheel. Professional limousine services employ licensed chauffeurs who undergo rigorous screening. Ask the company directly:
Do your drivers hold a commercial driver’s license (CDL) with passenger endorsement?
Are all chauffeurs subjected to regular drug testing and background checks?
If a company uses unvetted independent contractors or sidesteps safety protocols, move on to the next provider.
3. Get Every Detail in a Signed Written Contract
Verbal agreements disappear the moment a dispute arises. Demand a clear, signed contract before paying anything. Make sure the document explicitly spells out:
The total cost (including taxes, fuel surcharges, and gratuity)
Overtime rates (charged by the minute or full hour?)
Maximum passenger capacity (overloading a limo is a major safety violation)
The cancellation and refund policy
A transparent contract prevents last-minute hidden fees and ensures you won’t be stranded due to a scheduling oversight.
4. Confirm the Vehicle’s Alcohol Policy
If your party plans to drink, clear it with the operator first. Open container laws vary significantly by state and province. In many jurisdictions, alcohol is only permitted in the passenger cabin if the limo company holds specific commercial permits and a solid partition separates the driver. Clarifying this upfront protects you from unexpected fines or a driver shutting down your trip mid-ride.
5. Check the Policy on Party Decorations and Sashes
While this sounds like a aesthetic choice, it quickly turns into a financial and safety issue. Ask if the company permits decorations, banners, or glitter. Some adhesives damage leather seats or obscure the driver’s visibility, triggering steep “excessive cleaning” penalties or damage fees. Get written confirmation on what is allowed inside the cabin so your celebration doesn’t end with a surprise charge on your credit card statement.
Book Early, Know the Real Cost
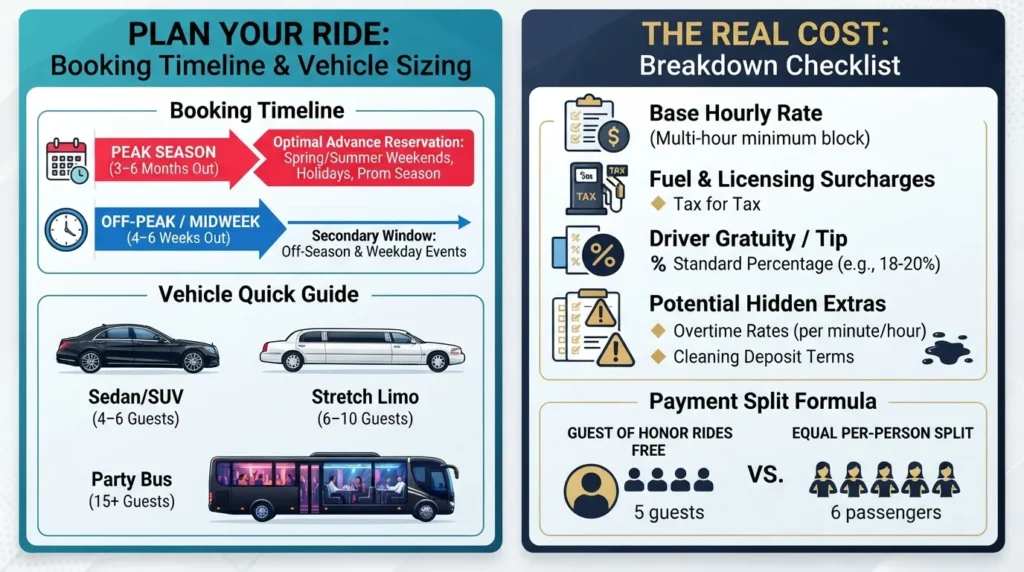
Timing your booking correctly and understanding the real cost upfront ensures you aren’t left scrambling for a vehicle or surprised by the final bill.
When to Book and Sizing Your Ride
For peak season weekends—especially during wedding season, prom time, or major holidays—book your limousine 3 to 6 months in advance. Fleet inventory fills up fast, and waiting until the last minute usually means settling for whatever vehicle is left over. If you are planning an off-season event or a midweek night out, a 4 to 6-week window is usually enough time to secure your top choice.
As you book, make sure you match the vehicle size to your actual headcount. Overcrowding ruins the experience, while hiring a vehicle that is far too large wastes money:
Executive Sedans & SUVs: Ideal for intimate groups of 4 to 6 passengers.
Stretch Limousines: Comfortably fit groups of 6 to 10 people.
Party Buses & Motor Coaches: Best suited for larger groups of 15 or more.
Right-sizing your ride keeps costs proportional to your group size while ensuring everyone rides comfortably.
Realistic Budgets and Splitting the Bill
Limo pricing is typically billed in multi-hour blocks rather than single trips. For a standard 4-hour rental, prices generally range from a few hundred dollars for a basic sedan or stretch limo up to higher rates for large party buses, with rates varying based on your region, day of the week, and local demand. Always confirm whether fuel surcharges, driver gratuity, or hourly minimums are included in the quote before signing.
When it comes to covering the bill, groups usually split the expense in one of two ways:
The “Guest of Honor Rides Free” Split: The total cost is divided equally among the guests so the bride, groom, or birthday guest doesn’t pay a dime.
The Even Per-Person Split: The total amount—including tip and extras—is divided equally among everyone on board.
Knowing your headcount early allows you to lock in the right size vehicle and clear up the budget details long before the chauffeur arrives.
4. Build the Itinerary Like a Safety Plan
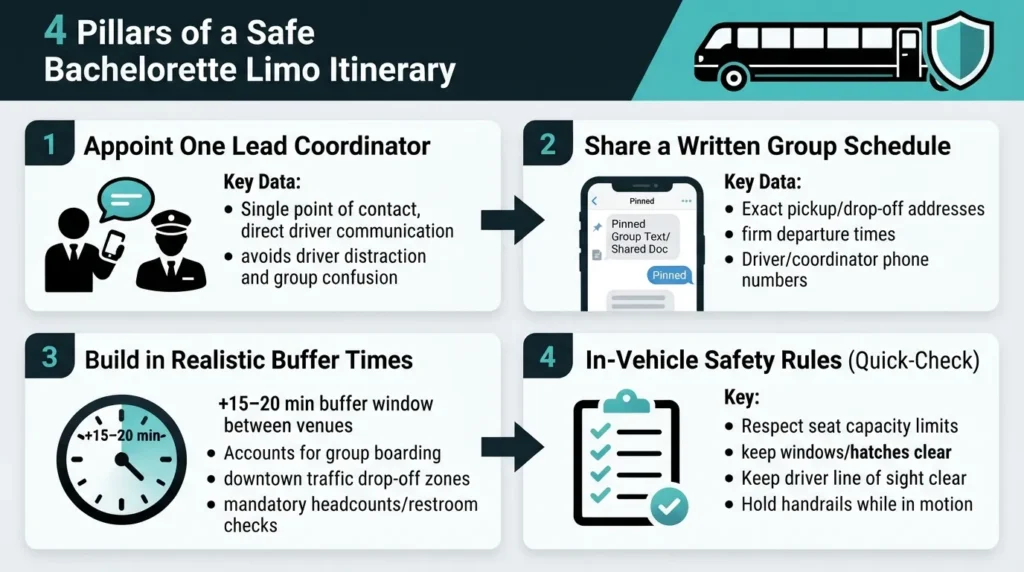
A great party bus itinerary does more than just list the night’s stops—it acts as your event’s primary safety framework. When alcohol is flowing and excitement is high, a tight, well-communicated schedule keeps the group safe, organized, and on the same page. Treating your timeline like a safety plan prevents chaotic last-minute changes, keeps your driver focused, and ensures no one gets left behind.
Appoint One Point Person to Coordinate with the Driver
Chaos ensues when six different people try to give the driver directions or request unexpected detours. Designate one primary coordinator—ideally someone who stays clear-headed throughout the night—to handle all communication with your driver and manage the group’s timing.
Having a single point of contact keeps things streamlined:
Prevents Driver Distraction: The driver can focus entirely on safe navigation rather than processing competing demands from passengers.
Streamlines Adjustments: If a venue is too packed and you need to move to the next stop early, your coordinator handles the change directly with the chauffeur.
Keeps the Schedule Moving: The coordinator serves as the internal timekeeper, letting the group know when it’s time to wrap up and head back to the bus.
Put the Schedule in Writing for the Entire Group
Don’t rely on word of mouth or assume everyone will remember the plan after a couple of drinks. Before the bus ever pulls up, publish the final schedule in an accessible place, such as a group chat pinned message, a shared Google Doc, or a group text thread.
Make sure your shared schedule clearly lists:
Exact pickup and drop-off addresses for every stop (including specific door or curb locations if visiting large venues or venues in crowded downtown areas).
Firm departure times for each location, clearly marking when the bus is leaving—with or without late arrivals.
The driver’s or coordinator’s contact info in case someone gets separated from the group.
If a guest wanders off or loses track of time inside a venue, having the addresses and timeline right on their phone allows them to rejoin the group or safely hail a ride to the next stop without panicking.
Build in Realistic Buffer Time Between Every Stop
The fastest way to ruin a party bus trip is by rushing people. Loading and unloading a large, festive group takes significantly longer than getting in and out of a regular car. If you schedule your stops too tightly, passengers end up feeling stressed, forced to down drinks, or tempted to run across street traffic to catch the bus.
Pro Tip: Add a 15- to 20-minute buffer to every stop beyond your estimated drive time.
Account for these often-overlooked delays:
Boarding and Headcounts: Getting 15 to 30 people back into their seats, settled, and accounted for takes at least 5–10 minutes.
Traffic and Drop-Off Zones: Party buses often cannot park directly in front of venue entrances and may need extra time to navigate tight streets or wait for designated unloading zones.
Restroom Breaks: A quick headcount check right before departing each location prevents accidental drop-outs.
Establish and Agree on In-Vehicle Rules Before You Roll
Safety rules are only effective if everyone agrees to respect them before the party starts. Before the vehicle leaves the first pickup spot, have your coordinator brief the group on basic ground rules.
PARTY BUS SAFETY CHECKLIST
[ ] Respect the Vehicle Capacity Limit
Never attempt to squeeze extra guests inside past the licensed seat limit.
[ ] Keep Sunroofs, Windows, and Hatches Clear
No standing through sunroofs, leaning out ceiling hatches, or hanging arms out windows.
[ ] Keep the Driver Unobstructed
Avoid standing directly behind the driver or using lasers and flash photography in their line of sight.
[ ] Hold On While in Motion
Use handrails and remain seated whenever the vehicle is actively moving.
Setting these expectations early protects your group from injury, prevents costly venue or vehicle damage fees, and ensures your driver can get everyone home safely.
5. Personal Safety Tips for the Night Out
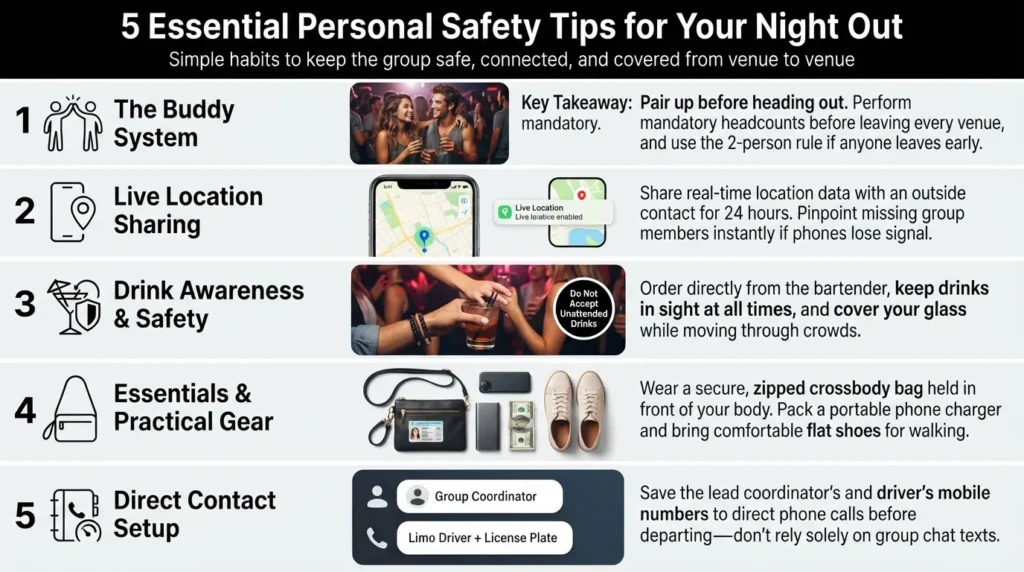
Most guides tell you how to pick a limousine company or calculate hourly rates, but they completely ignore what happens once the party steps off the bus. The actual night out—navigating packed venues, moving between stops, and staying safe in crowded nightlife districts—is where most risk occurs.
Taking a few proactive personal safety measures ensures that everyone in your group returns home safely without ruined plans, lost valuables, or dangerous mishaps.
Implement a Strict Buddy System
Never let anyone wander off alone, especially in unfamiliar nightlife areas or multi-story venues. Group members should pair up before the night begins, acting as each other’s primary check-in partner at every single stop.
Mandatory Headcounts: Before the bus departs for the next venue, your group coordinator should verify that every pair is accounted for.
Never Leave Anyone Behind: If your buddy needs to use the restroom, step outside for fresh air, or grab a coat from coat-check, go with them.
The “Two-Person Rule” for Leaving: If someone decides to call it an early night, their buddy (or designated group member) should escort them safely to their ride share.
Share Live Location Data Outside the Group
Before taking the first sip or heading to the first location, every member of the party should share their real-time location with at least one trusted friend or family member who is staying home for the night.
Use Built-In Tools: Features like Apple’s Find My or Google Maps Location Sharing allow emergency contacts to track your position throughout the evening without requiring constant text updates.
Set the Duration: Share your location for 24 hours so it covers the entire duration of the event, including the ride back home.
Why It Matters: If a phone gets lost, a battery dies, or someone gets separated, an outside contact can quickly pinpoint the group’s last known location.
Guard Your Drinks and Order Directly
Drink tampering can happen in seconds in crowded bars, clubs, or lounge areas. Maintaining strict control over what you drink is one of the most effective ways to avoid unsafe situations.
Order Directly from the Bartender: Avoid accepting open drinks from strangers or picking up unattended glasses from tables or bar counters.
Keep Drinks in Hand: Never leave a cup or glass on a ledge, table, or bar top while you step away to dance or use the restroom. If you lose sight of your drink even for a minute, dump it out and order a fresh one.
Cover Your Glass: When walking through crowded venues, hold your hand or a coaster over the top of your glass to prevent uninvited substances or spills.
Secure Your Essentials in a Cross-Body Bag
Losing an ID, credit card, or smartphone can derail an entire evening. Carrying valuables in your hand, back pockets, or loose jacket pockets invites theft or accidental loss in dark, crowded rooms.
PERSONAL VALUABLES CHECKLIST

[ ] Wear a secure cross-body bag or zippered belt bag held in front of your body.
[ ] Keep cash, ID, and primary cards stored in a zipped inner compartment.
[ ] Never tuck your smartphone into a back pocket or leave it on bar counters.
[ ] Keep a slim portable power bank and charging cable in your bag.
Keeping your hands free makes it much easier to balance while the vehicle is in motion and ensures your core essentials stay safely attached to you all night.
Wear Practical, Comfortable Footwear
Dimly lit venues, wet bar floors, steep stairs, and historic cobblestone streets make high heels and slick-soled shoes a major hazard. An ankle injury or a nasty slip can end the night prematurely for your entire group.
Choose Stability Over Height: Opt for low blocks, stylish sneakers, or dress boots with solid rubber soles that provide proper traction.
Pack a Backup Pair: If high heels are a must for photos, carry a foldable pair of flats or comfortable shoes in your bag to swap into before walking between venues or navigating uneven pavement.
Save Key Contact Numbers Before Departure
Relying on group chats when cellular networks are congested inside crowded clubs often leads to delayed messages. Direct phone calls are far more reliable in urgent situations.
Before the bus rolls out, make sure every guest saves two vital numbers directly into their phone contacts:
The Lead Coordinator’s Mobile Number
The Driver’s Mobile Number (and Bus Identifier/License Plate)
Having direct access to these contacts allows any guest who gets separated or delayed to quickly notify the driver or coordinator before the vehicle departs for the next destination.
6. Guest List: Who Actually Comes to the Bachelorette Party?
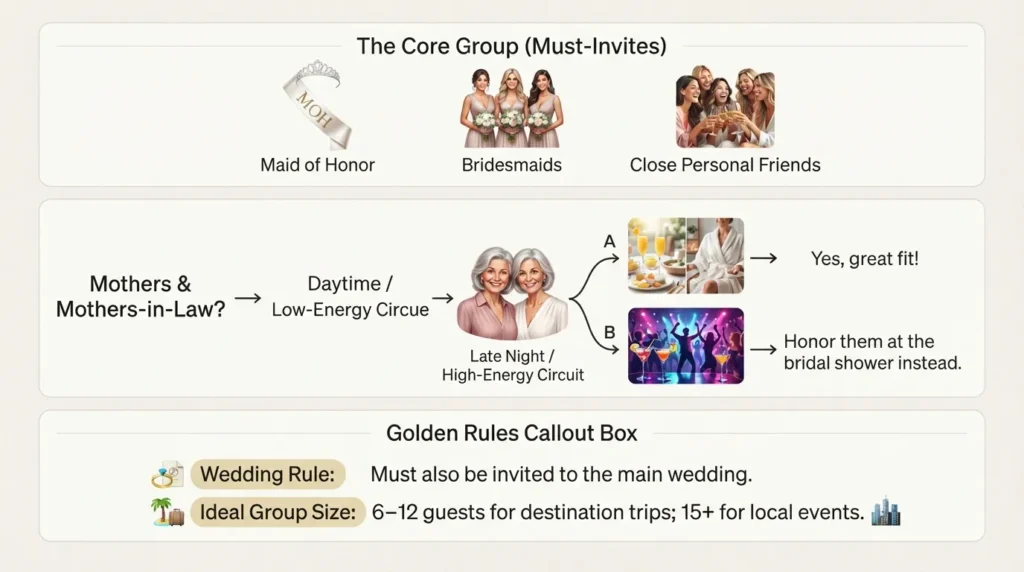
Determining who to invite to a bachelorette party comes down to a simple balance: the guest list traditionally consists of the bride’s closest friends, siblings, and the core bridal party, though family inclusion varies depending on the bride’s personal preferences and the overall vibe of the event.
There are no hard legal rules, but navigating guest list expectations early keeps planning stress-free for everyone involved.
Who should be invited to a bachelorette party?
The standard bachelorette party guest list includes:
The Maid/Matron of Honor and Bridesmaids: The core group leading the celebration.
Close Personal Friends: Friends who may not be in the wedding party but are a big part of the bride’s daily life.
Sisters and Sisters-in-Law: Immediate family members on both sides, provided they share a close relationship with the bride.
Generally, anyone invited to the bachelorette party must also be invited to the wedding. Inviting someone to a multi-day or higher-cost pre-wedding event without extending a wedding invitation is widely considered a major social faux pas.
Does the groom’s mother attend the bachelorette party?
Traditionally, the groom’s mother does not attend the bachelorette party—she is typically honored at the bridal shower or wedding shower instead. However, modern wedding etiquette makes this entirely the bride’s decision.
Whether to invite the mother of the groom usually depends on three factors:
The Vibe of the Trip: If the celebration involves a relaxing wine-tasting weekend, a spa day, or a cozy cabin retreat, inviting mothers or mothers-in-law often fits naturally. If it’s a high-energy weekend in Vegas or a late-night club circuit, it may not be her scene.
Your Relationship: If the bride and her future mother-in-law already share a close, friendly dynamic, extending an invite can be a warm gesture.
Split Itineraries: Some brides host a joint daytime activity (like a floral workshop or bottomless brunch) where mothers are welcome, followed by an evening event reserved strictly for peers.
How to Keep the Group Size Manageable
While it’s tempting to include everyone, larger groups add logistical complexity, higher housing costs, and dinner reservation headaches.
Rule of Thumb: Keep the guest list between 6 and 12 people for destination trips. Larger groups (15+) work best for local, single-day events where headcounts are easier to manage.
Before finalizing the list, the host or Maid of Honor should review every name with the bride. The bachelorette party should be a space where the bride feels completely comfortable letting loose surrounded by her most supportive circle.
What to Pack Quick Checklist
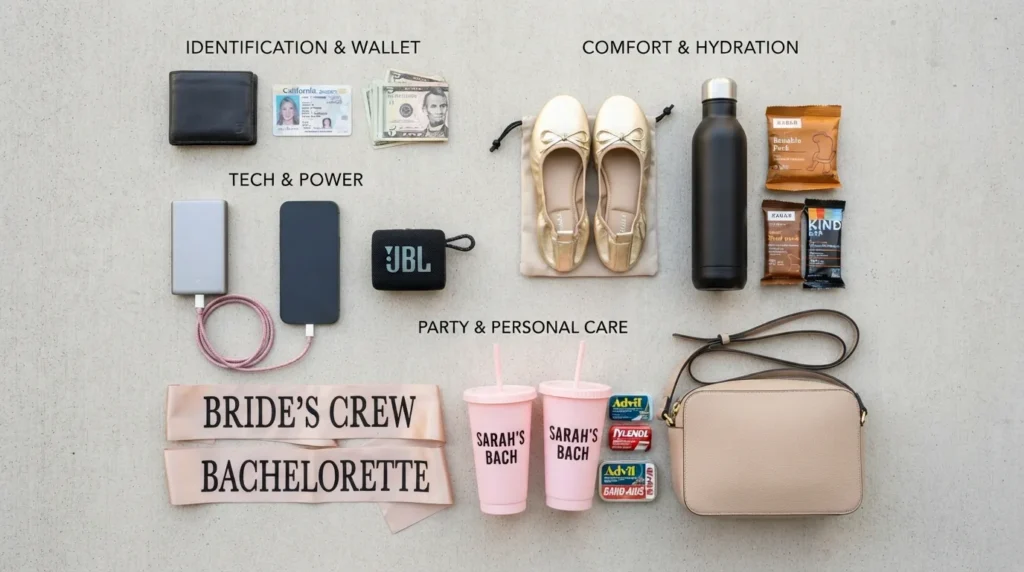
Having the right essentials on hand keeps the party running smoothly and prevents unnecessary detours. Here is a quick, no-fuss packing checklist to review before stepping onto the bus:
IDs and Necessary Documents: Driver’s license, passport, or government photo ID required for age verification at venues and aboard the vehicle.
Cash and Small Bills: Perfect for tipping your chauffeur, paying venue cover charges, and making quick purchases without waiting on card readers.
Phone Charger and Power Bank: A portable battery bank ensures your phone stays charged for photos, video clips, and staying connected throughout the night.
Decorations and Party Favors: Sashes, banners, custom cups, or themed props to customize the interior (confirm your driver’s decor policy first).
Snacks and Bottled Water: Hydration and quick snacks to keep everyone energized and comfortable between venue stops.
Comfortable Change of Shoes: Flat shoes or sneakers to swap into after wearing heels or dress shoes during long nights on your feet.
Essential Medications: Any required daily prescription medications, motion sickness remedies, or pain relievers.
Portable Bluetooth Speaker: Backup music source in case you want tunes during outdoor regrouping spots (if allowed by your charter agreement).
Frequently Asked Questions – Bus from Pearson to London
A typical bachelorette party spans 2 to 3 nights, usually running from Friday afternoon through Sunday morning or afternoon. This length allows enough time for a main night out—such as hiring a party bus or limousine for dinner and clubbing—alongside casual group activities like a spa day, pool lounging, or a relaxed brunch. While local celebrations might only last a single evening, weekend destination trips have become the standard for modern bachelorette itineraries.